Pages

Showing posts with label 2019 Science. Show all posts

Wednesday, 27 November 2019

Fuels and Climate

What is the greenhouse effect?

The atmosphere has the ability to trap the suns heat in it and keep the Earth warm is called the greenhouse effect. The greenhouse effect, of course, works like a greenhouse. The base of this effect is a good thing, however, the heat of the Earth is increasing due to the rising amount of unnatural gases entering the atmosphere. These are gases such as methane and carbon dioxide. The rising amount of gases traps more heat in the Earth and is causing the Earth to heat up. Although, without this effect, we would be dead. Without an atmosphere, our Earth would be as cold as -18 degrees Celcius during the day, and as cold as -160 degrees Celcius during the night. This effects even traps heat during winter seasons.

The process of the greenhouse effects includes the first solar radiation passing through the atmosphere. Some of this is then reflected by the atmosphere and the Earth's surface while a large amount still passes through. The solar radiation that reaches through the atmosphere is then absorbed by the surface and warms the Earth, the surface then radiates heat as infrared radiation. Some of the greenhouse gases are then reflected back onto the Earth due to the greenhouse gases, this increases the heat even more.

https://climatekids.nasa.gov/greenhouse-effect/

Effects of global warming?

The effects of global warming have become overwhelmingly more noticeable over time. Glaciers have largely shrunk, the ice in rivers and lakes is melting and rising heat. This seems a small change, however, there are larger and much more important future events that global warming will cause. Global warming will soon cause longer and more intense droughts, heavier and larger amounts of winter rainfall, more frequent wildfires, tropical bugs will soon be able to spread diseases to other countries as the climate becomes suitable to them, weather patterns will become more extreme and erratic and will largely cause more violent tropical storms and similar violent weather occurrences, and the melting of ice will cause a rising sea-level. So to all the idiots who think global warming doesn't exist, I hope your country rises in heat the most and causes you to catch a disease that is incurable. 

Thursday, 24 October 2019

Volcanoes & Mount Vesuvius

How do volcanoes form?

Volcanoes form when an oceanic plate subducts underneath a continental plate. This occurs because of the denser oceanic plate being forced underneath the continental plate. While this is occurring, the oceanic plate melts as it is pushed down further towards the mantle, becoming less dense. This liquid rock -- called magma -- rises to the surface and causes a pressure build-up inside of the Earths crust. It eventually breaks through the cracks in the continental plate, causing a volcano. Now coming out as lava, the liquid rock creates a new crust, and after several volcanic eruptions, it forms the well-known volcano shape. Volcanoes are most commonly found in the ring of fire, an area of the Earth where the Pacific plate resides. This oceanic plate is one of the largest and due to being an oceanic plate will subduct around all the surrounding continental plates. This causes the many volcanoes that surround the Pacific plates edges.  

Mount Vesuvius

Image result for mt vesuviusLocated on Italy's west coast, Mount Vesuvius was only 8 kilometres away from Pompeii. The city this volcano famously destroyed in 79 AD. Mount Vesuvius' last eruption occurred only 75 years ago in the March of 1944, beginning on the 17th, it was said to have lasted a fortnight. The eruption killed a reported 26 Italian citizens and another three were killed in Terzigno by volcanic rocks falling from the volcanoes explosion. This is a lucky escape for most as the volcanoes destruction was large, the lava bombs that came from the sky were said to be the size of a basketball. This is especially impressive when we look into the 1998 incident, where 150 people were killed by a large amount of ash rain, debris flows and ash deposits. 

Are there and stories or myths surrounding it?

The mythological significance surrounding Mount Vesuvius spawns from the Ancient Romans beliefs in their gods. The stories have to do with the stories of Jupiter, the god of sky and lightning, and his son, Hercules. So much so, they considered the mountain devoted to the demigod Hercules. This is because while completing his labours, he crossed a 'plain of fire,' or 'from a hill which anciently vomited out fire ... now called Vesuvius.' The destructions of Pompeii notably was thought to be Jupiter's doing, and that he was attempting to remind humanity of who is in charge. 

Volcano Model

After researching volcanoes we were given the task to create a model of one of the volcanoes that one of the members in our group had chosen. My group's volcano was modelled after my volcano, Mount Vesuvius. Using paper mache, we created the structure of the volcano and later painted it. As any class would've done with many volcano models, we made them erupt, however, it was not the typical baking soda and vinegar mixture. Instead, we used 20mls of 35% hydrogen peroxide, 4 small scoops of potassium iodide, 20mls of water and a squirt of dishwashing liquid to create Elephants Toothpaste. Food colouring and glitter was also added for colour and effect. 


First, we mixed the potassium iodide and the water together in a small beaker until it was clear. While I was doing this my team members created the mixture of all the other ingredients and tipped them into the bottle inside of the volcano.  To create the final explosion we added the iodide mixture into the bottle and watched the magic.


This experiment worked because Hydrogen peroxide is water and oxygen and slowly separates into these two things, the potassium iodide was added to the hydrogen peroxide to speed up the process of the separation. This created the illusion of an eruption. The glitter we had added into the mixture gave a stunning effect afterwards that the lava was made of pure glittering gold.


Tuesday, 10 September 2019

Land Yacht

Aim: To make a wind racer that will travel a set distance the fastest.

Equipment:

  1. Wooden trolley
  2. 1 metre of paper
  3. Cardboard
  4. Tape
  5. Metal rod
Method:
  1. Screw the pole onto the trolley.
  2. Tape strips of cardboard onto the base of the pole to form the base of the sail.
  3. Cut out a large piece of paper and fold it over the pole to form the sail.
  4. Tape it all together and ensure that it's stable and secure.
  5. Decorate the sail and name the sail.
  6. Use a leaf blower to blow the vessel as far as possible.
  7. Measure the distance and speed the vessel travels.
Results:

During the racing of our land yacht, we achieved a distance of 1.9 metres in 13.5 seconds. This means that the yacht had a velocity of 0.14m/s-1.

Discussion:

While we raced the yacht itself, we did not keep it at a constant speed, because of the lack of support in our sail, it blew forward and didn't catch the necessary wind to propel it forward at the desired velocity. The unbalanced forces that constantly acted upon the yacht did not assist, had it gone any further, it would have likely tipped forward. This would've happened due to the heavyweight of the metal pole. As said, we did not have enough support in our sail, this would have been solved by putting more cardboard into the sail to prevent it from blowing in every direction and instead, staying in place.

Conclusion:

In conclusion, many of the problems we found with the sail we created had to do with the design of it and how much time we spent on artistic developments. We focused rather on the creative award that was being given, instead of the distance and time award.

Tuesday, 13 August 2019

Building a Simple Electric Motor

Aim: To build a simple electric motor.

Equipment: 400mm of un-insulated copper wire*, AA battery, 2 small magnets - neodymium magnets apparently work well.

(*It can be uninsulated by sanding the protective layer off, this leaves only the pure copper left to work with.)

Method:


  1. Bend your wire in half and lay the bend over the point in the middle of the template below.
  2. Now work around each side of the wire, bending it along the line as you go. IGNORE VIDEO THINGY.
  3. Place both magnets on the negative terminal of your battery.
  4. Place the curved sections of wire around one magnet each. Ensure that they are free to rotate. 
  5. Balance the pointed part on the positive terminal.
  6. If you've done everything correctly when you let go the wire to should begin to spin!


Results:

Unfortunately, I was unable to recreate this experiment as the forces of gravity seems to dislike me. I would have attempted it again the next day, however, SOMEONE managed TO BREAK THE MAGNETS. As you can tell, I am unimpressed with this development. But I have moved past this and instead blogged about my complete and utter failure. I would have chosen something else to research and blog about, but my teacher said to just talk about this instead.

Discussion:

This electric motor spins because the wires are conducting electricity, and therefore electrons. This electric motor converts electric energy into motion. The electrons need to constantly move, because of this and the way the wire is twisted, the easiest way for the electrons to flow and keep moving is to push against the magnetic field. This magnetic field has come from the two magnets at the bottom of the battery.

Wednesday, 31 July 2019

Metallurgy Science Project

Just like at the end of every topic in Science, we create a presentation to display some of the many things we have learnt. These are selected from lists given to us by our teacher. The three that I have chosen this time are -

  1. Carry out the test for carbon dioxide gas.
  2. Carry out the test for oxygen gas.
  3. Carry out the test for hydrogen gas.

Monday, 1 July 2019

Testing for Carbon Dioxide gas

Aim: To show that carbon dioxide is produced when a metal carbonate reacts with acid.

Equipment:

Two boiling tubes
Delivery tube and bung
Test tube rack
Wooden splint
Hydrochloric acid (the acid)
Calcium carbonate (the metal carbonate)
Test tube tongs
Safety glasses
Lighter

Method:

  1. Add a pea-sized amount of the metal carbonate into one of the boiling tubes.
  2. Place this boiling tube into a test tube rack. Ensure you have the bung and delivery tube ready.
  3. Add 5ml of acid to the boiling tube and quickly insert the bung and delivery tube into the mouth of the boiling tube.
  4. Holding the other boiling tube with your tongs, capture the gas produced. 
  5. When you think that the tube is full, light a wooden splint. 
  6. Carefully remove the boiling tube from under the delivery tube, taking care to keep it facing upward. 
  7. Insert the burning splint into the mouth of the test tube. 

Results:

Test 1 including the stated experiment showed the splint going out in an instant within entering the test tube. It had choked and died due to having no oxygen within the space

Test 2 with lime water in the receiving tube and without the splint lighting showed the liquid within the receiving tube grow cloudier and foggier.

Discussion:

Within the experiment, we watch a chemical occur between the metal carbonate (the calcium carbonate) and the acid (the hydrochloric acid).

Calcium carbonate + Hydrochloric acid = Calcium chloride + Carbon dioxide + Water

As the gas went through the delivery tube the receiving tube filled with gas and had it gone longer it would have left a mixture of carbon dioxide and calcium chloride in the first boiling tube.

Making a Metal Oxide

Aim: To create a metal oxide and observe the difference in properties of the product compared to the reactants.

Equipment:

A piece of magnesium
Bunsen burner
Safety glasses
Metal scissor tongs

Method:
  1. Light your Bunsen burner.
  2. Hold your piece of magnesium in the scissor tongs. Ensure you are holding the very tip of the strip.
  3. Place the opposite end into the flame, at the very top of the blue flame, at its hottest.
  4. When the magnesium begins to burn, DO NOT DIRECTLY LOOK AT IT. The light emitted from the magnesium can permanently damage your eyes.
Results:

The metal sparked and began to glow a bright white. Once it ceased the magnesium to a white ashy strip. This means the experiment was a success.

Discussion:

The magnesium being burned is a process that causes the to magnesium react with the oxygen to create magnesium oxide. The reaction creates an extreme heat which causes the bright light as well due to the amount of energy created. What's left (the ash white and crumbly mess) is called magnesium oxide. The reaction can be sped up or slowed down depending on the temperate (of the bunsen burner) that causes the reaction.

Thursday, 13 June 2019

Acids and Bases Science Project

This is my science project for the topic Acids and Bases, the topics within it I chose were,
  1. Write word equations for acid-base reactions.
  2. Explore the process of neutralisation.
  3. Classify solutions as acidic, alkaline, or neutral, using pH scales.


Friday, 31 May 2019

Making Salts

Aim: To produce copper sulfate salt by reacting copper sulfate with an acid.

Equipment:

Copper oxide powder
Dilute (0.5 mol L-1) sulfuric acid
50mL measuring cylinder
Two 100mL beakers
Bunsen burner
Tripod
Gauze mat
Funnel
Filter paper
Thermometer
Spatula
Evaporating basin
Stirring rod

Method:

  1. Add 20mL of sulfuric acid to a 100mL beaker. Heat the acid over the Bunsen burner until it reaches 70 degrees Celcius. Turn off the Bunsen burner.
  2. Once heated, use a spatula to add pea-sized portions of copper oxide to the beaker. Stir the mixture for around thirty seconds.
  3. Repeat step 2 until no more will dissolve, allow the beaker to cool.
  4. Fold the filter paper and place it into the funnel. Place this into the empty second beaker.
  5. Make sure your beaker with the copper sulfate is cool enough to hold at the top. The contents should still be hot. You may need a guardian to complete this step.
  6. Gently swirl the contents of the beaker, allow it to mix together. Then pour it through the filter paper in the funnel. Allow all contents to filter through.
  7. Rinse the beaker you used to heat the mixture out and place it back onto the tripod, filled with 50-60mL of water.
  8. Place the evaporating basin on top of the beaker and carefully pour the solution from the second beaker into the evaporating basin.
  9. Gently heat the beaker until the solution in the evaporating basin has reduced by half.
  10. Leave the evaporating basin to cool. Once cooled, move the evaporating basin to a warm place where it won't be disturbed (a window-sill) and observe over some days.


Results:

We were able to somewhat create the desired salt, except that it isn't ours. Our experiment was destroyed by another classes student, this is the results of their experiment.

However, on Monday this should be redone with the experiment that is being recreated.

Edit:

This is the actual experiment that we had redone, we believe this is better and an even better experiment than the one Mr Stock created for us.


Discussion:

During the experiment, we were able to recreate the original. The acid in the sulfuric acid was combined with the copper oxide powder and triggered a chemical reaction which created the copper sulfate salt. While in the earlier parts in the experiment, if you did it yourself, you would have noticed that it was a complete liquid until when you next checked up on it after some time. By when you looked at it, it would have crystalized. This is simply because after evaporating the water molecules only the copper sulfate salt was left.

Conclusion:

We don't currently have a conclusion of whether the experiment worked or not. However, we can report that we followed all the instructions to a tee. This post and my other classmates will be later on updated with the results of the experiments.

Edit: As we finally do have a conclusion and a finished experiment we believe that we completed the experiment successfully and the salt is perfectly made.

Thursday, 30 May 2019

Neutralising Reactions

Throughout our newest Science topic, Acids and Bases, we have been learning about things such as pH testing and making our own indicators out of household chemicals, foods and other items. The latest experiment was Neutralisation, where we combined some acid and some base as well as Universal indicator to attempt to create a neutral solution.

Aim: To observe or create a neutralisation reaction.

Equipment:

A test tube
Test tube rack
1 mol L(-1) Na(2)CO(3) (sodium carbonate),
1 mol L(-1) HCl (hydrochloric acid)
Dropper or dropper bottle / Pippette
Universal indicator solution

Method:
  1. Add approximately 1-2mL of the Na(2)CO(3) and place the test tube into the test tube rack.
  2. Add 3-5 drops of Universal indicator.
  3. Using a dropper bottle or dropper, add the HCl drop by drop. Be careful, even two drops extra can make you miss the neutralisation point.

Results:

During this experiment, while we did reach a neutralisation point, we were able to create a rainbow out of the colours we made. Using decisive and exact amounts of acid and base to create a precise colour to add to the six colours of the rainbow we made, this included red, orange, yellow, green, blue and violet.

Discussion:

During the experiment we attempted to balance the colours in the pH levels, the strongly acidic solutions are identified by the universal indicator as red, on the pH scale the strongest acidic solutions that appear red have a pH level of 1 - 2. On the other end of the spectrum, the deep violet colour shown to us by the universal indicator is an extremely basic solution, with the pH scale knowing it as a solution most likely between the levels of 13 - 14. While the opposite spectrum ends are quite interesting, the real experiment was the green solution. When experimenting with the acids and bases, after mixing them together, with the universal indicator as well, it is somewhat difficult to create the solution, due to how quickly it can switch from a yellow solution to a blue one with too much base.

Conclusion:

In the end, our experiment was successful as multiple of the people within our group were able to create a neutral solution. Multiple of us due to a small race we had to attempt to create a neutral solution first.

Tuesday, 21 May 2019

BOTTLE ROCKETS

Aim: To launch a functioning vinegar and baking soda bottle rocket with the intention of staying in the air the longest and having the most creative design.

Equipment:
  • 1.5L Plastic Bottle
  • Tape 
  • Cork
  • Pencils
  • Cardboard
  • Something to decorate
  • Baking Soda
  • Vinegar
Method:
Image result for vinegar and baking soda bottle rocket
Not our rocket
  1. Take the empty plastic bottle and discard the cap. Next, take the pencils and tape them to the side of the rocket so they extend past the mouth of the bottle. Wrap the tape around these pencils more to stabilize them, these will act as your stands.
  2. Make sure your cork fits the mouth of the bottle and it isn't too big or too small.
  3. Add a cone made out of cardboard and paper, try to make it thinner so it is more aerodynamic and can fly further and easier.
  4. Decorate!! We named ours the 'Rat Rocket' and have various designs on it.
  5. Create a funnel out of paper or take an actual funnel, this will be used to funnel the baking soda into the bottle.
  6. Take the bottle outside and get ready to fly it. Fill the bottle with vinegar, not too much to outbalance the baking soda though. Make sure there are other people around to help you with the next steps. Have someone stand by with the cork.
  7. Pour the baking soda into the bottle through the funnel and quickly put the cork in the bottle tightly and stand it on the pencils.
  8. FIRE IN THE HOLE!!!

Not even close to our rocket but was an inspiration and basis

Friday, 3 May 2019

Making a Model Atom

Later on edit:

I majorly screwed up with this.
There are so many things wrong with this.
Nitrogen has seven electrons; Beryllium has four.
If I talk about Beryllium in this post using a 2,5, kinda pattern, I screwed up, Nitrogen has that pattern, Beryllium has an electron pattern of 2,2.
Ignore any scientific explanation and the diagram, I know I screwed up the diagram majorly, so you shouldn't really trust the science either

Aim: To make a model atom.

Equipment:

Paper
Tape
Beads
Blue Tack
String

Method:

With these instructions, you will be making a model of the atom Beryllium, this particular atom has four protons (silver beads), four neutrons (gold beads), and seven electrons (black circles).
  1. Take a piece of paper and fold it into quarters. Cut three quarter circles from the folded corner. Throw ring two out. You don't need it.
  2. Next, take your rings, on the smaller ring, draw two small black circles connected to one another. On the second larger paper ring, draw two pairs of circles and a singular circle by itself. Make sure to set these away from each other as shown in the results.
  3. Put the rings aside and take out your blue tack, stick all eight of the beads on, whatever the colour, it doesn't matter, as long as four are one colour and the other four are another. This is your nucleus.
  4. Take your string and press it into the blue tack, making sure it sticks on without either piece falling.
  5. Take your smallest ring and flip it upside down so you can't see the beads. Take the blue tack, beads and string and align it in the creases of the paper and in the middle of the ring. Use the tape to stick the string to the paper on both sides.
  6. Repeat with the larger ring.
  7. Grab your nearest periodic table and design your own little label for the atom, like you'll see mine has, I personally went with a basic one.
Results:


Discussion:

What makes up the atom? + Plus answering other things!

The three main particles make up the atom, including electrons, protons and neutrons. While the protons and neutrons are located in the nucleus, the electrons form shells, wanting to form a full outer shell to become an ion. From what I know, atoms have three shells, two outer and the first shell. The first shell can only hold two electrons, once it has that many electrons, the electrons go to the next shell, which can hold a maximum of eight, if that is at its maximum capacity, it goes to the next shells, all of which, if there are more than two outer shells, can hold a maximum of eight. The example above, Beryllium, does not have a valance shell (full outer shell), and it would gain one by either losing or gaining electrons. Since Beryllium's pattern is 2,5, it's best bet would be to gain electrons, therefore gaining a valance shell and becoming an ion. The way that it would gain these electrons would be through a chemical reaction. During a chemical reaction, atoms either lose or gain electrons to gain a valance shell.
The major differences between the particles in an atom are their sizes, charge, and place. As discussed, the protons and neutrons are in the nucleus, while electrons surround them to form the shell or shells. You may think that the particles are all the same sizes, and while protons and neutrons are the same sizes, however, the electron sets itself away from them again by being a two-thousandth of their size. The only thing that I know that sets the protons and neutrons apart is their charge, protons are filled with a positive charge, neutrons have no charge, and electrons have a negative charge. Due to this, the atom Beryllium's whole charge is -3, however, after becoming an ion with a valance shell, it would become -6.

Tuesday, 9 April 2019

Genetics Summary


Since Medical Science we have been working through Genetics. Once again we had to choose four of the learning goals and do small little things on them, I chose to do mine on Canva instead of a slideshow like last time. I basically made a small page on each of the four I chose,

  • Understand the key differences between asexual and sexual reproduction
  • Describe 'Variation' and describe the importance of it
  • Discuss the process of cloning and it's ethics
  • Complete Punnett Squares in order to predict inheritance patterns

Tuesday, 26 March 2019

Deoxyribonucleic Acid Extraction Experimentation

Aim

Our aim in this experiment with the DNA of kiwifruit and investigate it.

Equipment

Scientific Spatula
A kiwifruit half
(Scientific) Spatula
Ziploc bag
(25mL of) Water
A pinch of salt
(Small) Cloth
Funnel
Beaker
Test tube
(A squirt of) Dishwashing liquid
10 mL of Ethanol

Method

  1. Cut the kiwifruit in half and, using a spatula, scoop it out into the Ziploc bag.
  2. Add 25mL of water and a pinch of salt.
  3. Close the bag and mush the kiwifruit into a soup-like paste.
  4. Place the cloth of the top of the funnel and the funnel over the beaker. Pour the liquid into the funnel/cloth. 
  5. Pour the liquid from the beaker into a test tube.
  6. Add a squirt of dishwashing liquid to the liquid and swirl. Allow sitting for five minutes.
  7. Tilt the test tube on a 45-degree angle and slowly pour the 10mL of Ethanol into the concoction.
  8. Allow the mixture to sit.

Results

The concoction after step 6.
The result was the concoction, after all the steps and allowed to sit, the concoction had white strands that rose to the top. This was the result of our experiment. It seemed to separate into three sections, the top looked like white strands all clumped together to form a cloud, the middle separated the 'foam' and the next part and appeared to be clear and seemed like water, the last and bottom part of the concoction looked like it was the juice of a kiwifruit and was a similar shade of green.


Discussion

The different liquids and equipment added to the mixture allowed us to see the DNA easier in the end. 
The water added to the kiwifruit helped break it up easier and didn't provide many other uses. The salt added would help the DNA of the kiwifruit clump together as seen as the white foam appearing at the top of the concoction.
The concoction after all steps.
The detergent provided use in the way that it helped the DNA become more prominent than just the white foam. It helped the DNA become more bubbly and easier to look at and study.
The Ethanol was what provided the strands of DNA or the foam to rise to the top. Ethanol has a different density to the water, therefore rising to the top, and bringing the DNA strands with it.


Conclusion

The conclusion of this experiment is that the experiment was a success as our only aim was to extract the DNA, not to delve into scientific experiments with the DNA itself. We were able to extract the DNA of the kiwifruit and just have a play around with it. We really had to do nothing but just extract the DNA.

Wednesday, 13 March 2019

Medical Science Summary


For the last part of our section on Medical Science, we have had to do a creative task reflecting what we have learnt. I go into further explanation in the slide. So, why are you reading this? Read the slide. That IS why I made it. Unless you've already gone through the slide, then, good job? You read something? I really don't know what to say.

Tuesday, 19 February 2019

Heart Attacks

What is a heart attack?

A heart attack is caused by a build-up of cholesterol or fat or other substances in the arteries that feed the heart. After the build-up clears away it leaves a clot, stopping the blood from passing through. This can severely damage the heart. Should the clot block the entirety of the artery the heart becomes starved of oxygen and leads to the cells in the heart muscle dying. This is not the only cause of a heart attack, it can also be caused by, in a rare case, a spasm of the coronary arteries means the coronary arteries tighten and prevent blood from flowing to the heart. Most conditions often don't lead to heart attacks, being temporary and not lasting long. But, in some cases, longer periods and more extreme cases of coronary spasms can lead to a heart attack.

What are the causes of a heart attack?

There are quite a few potential causes for a heart attack, but just because you have or experience one of these causes, it does not ensure you instantly for a heart attack.
  • Age, often men over the age of 45 and women over the age of 55 are more at risk of a heart attack than younger people.
  • Smoking, tobacco, as well as the secondhand smoke from it, can put you at risk.
  • High blood pressure, having high blood pressure can often damage the arteries that feed blood to your heart, putting you at further risk.
  • Obesity, cases of obesity often come along with other things such as high blood pressure, high cholesterol levels, high triglyceride levels and other things that can cause a heart attack.
  • Diabetes, not producing enough insulin or not responding to the insulin properly can cause your blood sugar levels to rise, increasing the risk of a heart attack.
  • Genes, family history of heart attacks can be an obvious giveaway to the genetic transition of a likely heart attack.
  • Physical inactivity, people who are known to regularly exercise have a lower blood pressure putting them at less risk than those who don't exercise regularly.
  • Stress, some people respond to stress in a way that can induce risk factors for a heart attack.
  • Drug usage, those who use stimulation drugs like cocaine or amphetamines are more at risk due to the fact they can trigger the spasm of your coronary arteries.
  • A different condition, having other conditions can often put you more risk of a heart attack.
  • Alcohol, having alcohol unless in moderation, is likely to put you at risk of a heart attack.

How can you prevent one?

To prevent heart attacks there is both a lot and a little you can do if you are only at risk of a heart attack due to genetics, there is nothing you can do. Let's say someone has a family history of almost no one having heart attacks, but they smoke, are an alcoholic and don't do much physical activity, depending on the severity, they could be at more risk than those only at risk because of genetics.  The only way you can prevent a heart attack is to avoid most of the things named in the list above. That could lead to more damage than any form of genetic transition.

What are the symptoms?

There are quite a few symptoms of a heart attack but they are quite recognizable.
  • Pain in the chest, shoulders, jaw, back or stomach, in some cases it is in more places than one
  • Shortness of breath
  • Sweating
  • Nausea
  • Fatigue
  • Discomfort, tightness, pressure, or squeezing in the chest.
  • An irregular heartbeat
  • A drop in blood pressure
  • Fluid enters the lungs
  • Vomiting
  • Coughing
  • Dizziness
  • Face appearing grey
  • Restlessness

What kind of treatment is there?

During a heart attack -

In the case that the person having a heart attack ceases breathing, CPR should be started immediately, with the usage of defibrillator if available, but until it is available it is best to start manual chest compressions to either the beat of Staying Alive by the BeeGees or Baby Shark. I have my questions about why they chose Baby Shark of all songs, but I won't complain if it keeps me alive.

After a heart attack -

Most people will have multiple conditions as repercussions of the heart attack. That can make reference to edema, a condition where fluid builds up in the legs and ankles, causing them to swell, congestive heart failure, where your heart will have a much weaker beat, often leaving a person exhausted quickly. There are many repercussions that can affect you after a heart attack, but most of these can be treated to at least improve the condition of the said person.

Phillip and his Phalanges

This is Phillip. Nadia, Molly and I drew Phillip during Science, where we have been researching medical science. In this picture, you will be able to see the bones we drew, using me as the base for tracing. You can also see there a few muscles coloured in there because Nadia and Molly weren't told till the last period that we needed to add muscles and I wasn't there to help. Thank you, Molly, for the photo, and also for gracing Phillip with his amazing hat, thank you, Nadia, for creating Phillip's phalanges, they have to be one of the most important parts about him, thank you. 

Wednesday, 6 February 2019

Arthritis

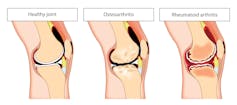
Arthritis, also known as joint inflammation, is a condition where bones that are a component of joints wear away the cartilage in between themselves and begin to rub against each other, wearing the bones. The result of this can be developments such as swelling, pain and stiffness in the joint itself. Although, these are just more basic forms of the symptoms and there are many others that come and go with the different forms of the disease. Over long times arthritis of all forms will begin to make daily tasks a struggle, with arthritis in the knees it will become difficult to perform tasks like climbing stairs and walking on upward or downward slopes. If you have arthritis in your elbow you may find it difficult to bend your arm and hold items.
a medical illustration of a healthy knee joint and one with osteoarthritis
newsnetwork.mayoclinic.org
There are over one hundred different forms of arthritis, but the two most common forms are osteoarthritis and rheumatoid arthritis. Osteoarthritis, which call also be known as 'wear-and-tear' arthritis, is the most well-known form of arthritis. It begins with the bones in the joint wearing away at the joint itself, whether it be through over-exercise, an injury, or obesity, pressure is put against the ends of the bones and wears away at the cartilage. After the cartilage has been worn away the bones rub up against each other, without the cartilage there to stop them from doing so, the bones press and chip away at each other, leaving shards of bone inside the arm itself. Rheumatoid arthritis, while similar to osteoarthritis, is in itself, something almost completely different when it comes to how it happens. The origin of the disease comes from when, for an unknown reason, the immune system, which usually would protect us from viruses and bacteria, instead attacks the joints. Due to this the tissue that lines the joints, known as the synovium, tends to thicken, resulting in swelling. If this goes unchecked and is ignored, the cartilage, like in osteoarthritis, breaks away and the bones soon chip away at each other, often resulting in weaker and unstable joints, in rarer cases joint deformity and many other unfortunate circumstances.
theconversation.com
There are many different things that contribute to the development of any form of arthritis, however, there are a few main factors that add to the risk of getting arthritis.
Genetics, the disease, in all forms, has been noticed to transition through genetic or family bloodlines. Injuries, if left unacknowledged, joint injuries, even if they appear to be alright and treated properly, can soon develop arthritis if the joint is repeatedly injured and constantly has weight on it.
Weight, if the skeleton endures an unhealthy amount of weight on the joints it can press the bones in the joints closer together, letting the cartilage wear away even quicker than the anticipated rate for more common forms of arthritis.
Age, it has been identified with arthritis that people over 65 have an around fifty percent chance to develop the disease in their joints if they haven't experienced it or are experiencing it already.
Repetitive actions, such as lifting boxes from one place to another, applies constant strain onto the joints in use, especially if it is for an extended period and then the person proceeds to lay down and not exercise the joints or use them.
Image result for arthritis
A case of Rheumatoid Arthritis.
gettyimages.fi
Gender, arthritis has been found to be common in women than men, although there is no scientific diagnosis as to why this happens.
There are many myths surrounding arthritis and how you can get it, especially one of the more common ones like 'If you crack your knuckles, you will get arthritis', this is in fact, false. My science teacher told me so so you can bring it up with him. But, there are many other myths surrounding arthritis and how it can affect your body. There are other myths than the ones I will bring up here, if you wish to look over the others they will be from the sources I will have.

  1. Only older people get arthritis, this is incorrect. There are over 300,000 cases of infants, children, and teenagers, having the disease in its different forms in their earlier stages of life.
  2. All pain in the joints is arthritis, this is incorrect. There are other conditions such as tendonitis and even in some cases, it can be simple as soft tissue damage that can appear to be arthritis at first.
  3. Taking it easy is the best thing for arthritis, this is incorrect. Regular exercise without overuse of the joint can be helpful to treat the joint, it is not a cure though.
  4. There is nothing you can do about arthritis, this is incorrect. While there is not an absolute cure for arthritis, regular exercise, reducing weight, having both time to relax and time to be active, sleeping well and having a healthier diet can assist, but not provide any medical cure, with arthritis.
  5. Applying heat to the joint is better than applying ice, this is incorrect. Both elements can help with the pain of arthritis in different situations, heat can be better for joints in the mornings while icing the pain can be more helpful before going to sleep. Both assist in dealing with the pain though.
Sources -